Too hot? Ice dam! Call the roofer or the framer team! If you came to this blog today expecting to get a catchy song stuck in your head, congratulations! If you came rather to hear some building advice that’s applicable to any new build, or existing home, it’s your lucky day!
All catchy songs aside, ice damming can be a serious problem here in Winnipeg. We’ve seen it in all sorts of homes, whether new or old. The problems that are caused by ice damming range from minor leaks in the roof, to leaks so egregious that they cause ceilings to collapse (true story, we had a request from a client to repair an ice damming situation on her house, because in her previous home the ceiling had fallen in due to an ice dam unloading a lot of water into her ceiling).
So here’s a brief primer on what ice damming is, what causes it, and how best to address it.
What is an Ice Dam?
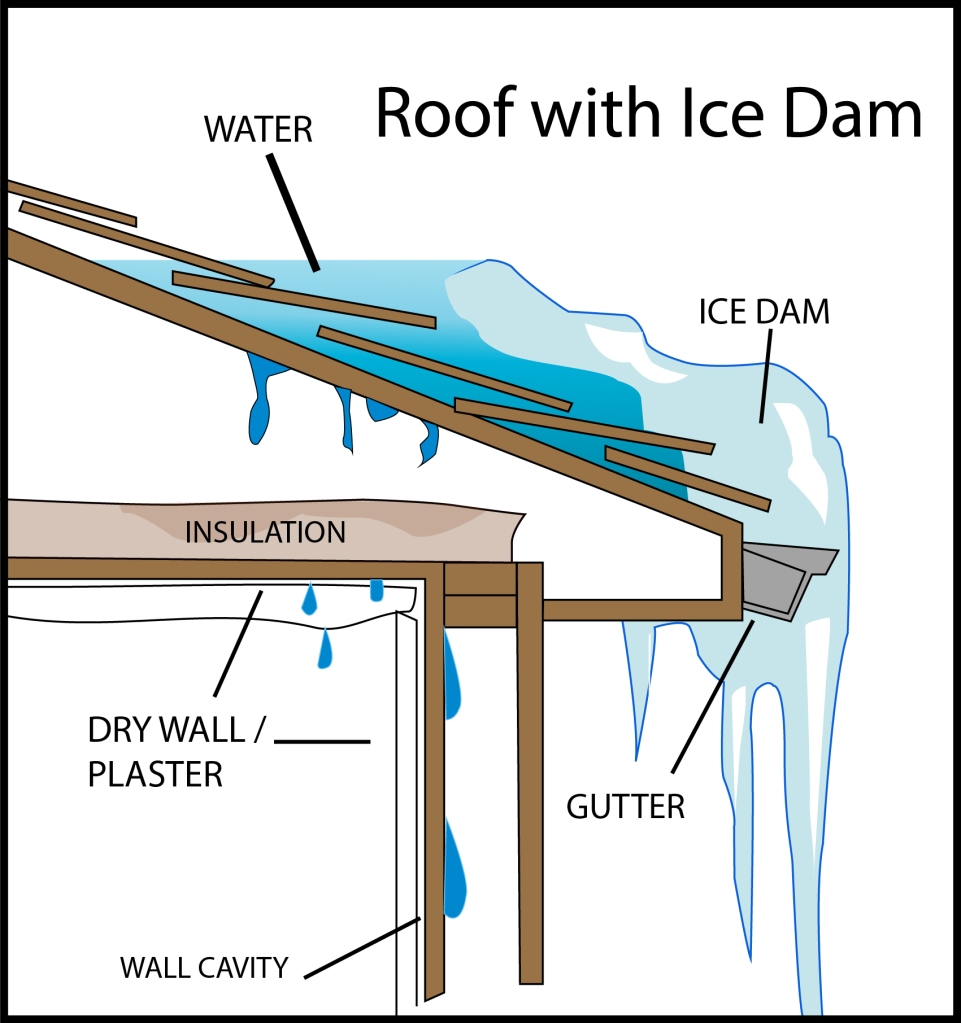
Ice damming is when snow melts from a higher portion of your roof, and slides down the roofing material, and hits your cold eaves where it freezes. When enough of that water freezes it creates a large chunk of ice that creates a pool of melted water just above it on your roof line.

A diagram showing how ice dams can lead to issues with moisture ingress
What’s the Danger of Ice Damming?
Ice dams can be responsible for a wide variety of issues. They can pull gutters off houses, rot roof decks, cause mold growth in attics and cause leaks into the house. They can also pose a safety hazard when they fall off either as icicles or as large chunks of ice. That danger is exacerbated when you have a metal roof.
What Causes Ice Damming?
Ice damming is caused by a combination of factors depending on your exact house condition. 1) inadequate roof deck ventilation. 2) inadequate ceiling insulation/vapour barrier, and is made worse by 3) inadequate roofing membrane installation.
When a roof deck is properly ventilated, you wind up keeping your entire deck at the same temperature. That means there aren’t those warm spots where snow can melt, drip down roof, and then freeze. To vent an attic you have to balance the ventilation that you have at the soffits, and the peak. You have to ensure you have clearance between your roof deck and your insulation at the heels of your trusses or rafters to make sure the air has an unencumbered route from soffit to ridge.
When your ceiling isn’t properly insulated or vapour sealed you wind up leaking a bunch of warm moist air into your attic. This causes the roof deck to heat up in some places, and condensation to form in others. The heat transfer from your conditioned indoor air, to your unconditioned attic space leads to snow melting and trickling down the roof deck to freeze at the eaves.
With proper roofing membrane installation you can combat the symptoms of ice daming. This shouldn’t be assumed to treat ice damming, it’s better by far to address the underlying issues, but with proper installation of ice and water membrane you’ll mitigate some of the effects of ice damming.
How Do I Fix Ice Damming?
You wouldn’t have read this far if you weren’t interested in a fix to the problem! Knowing what causes the problems goes a long way to addressing them. Often times the solution will vary from house to house depending on the issues at play. But a generic fix-all would be this.
Install baffles at your rafter heels to allow for smooth and even venting of roof deck. It’s recommended to install them every rafter space for optimal performance. If you’re building a new home we recommend increasing your rafter heel heights a bit for a better insulation detail.
- Ensure your ventilation is properly balanced. National Building Code in Canada mandates no more than 25% of ventilation be at either top or bottom location and that you have 1 square foot of ventilation for every 300 square feet of insulated ceiling area. If your roof slope is less than a 2/12 you have to have 1 square foot of insulation for every 150 square feet of insulated ceiling space. In older homes this may mean cutting vent holes in your wood soffits to ensure the attic has ventilation.
- Ensure you have a proper vapour barrier and insulation blanket in the attic. For old homes this often requires removing the existing insulation, and then spray foaming a 3″ layer over your rafters, and then insulating the rest with cellulose to hit a minimum of r-50. We’d recommend going to r-80 because the cost of insulating that extra r-30 is marginal, but provides huge savings.
- If you’re re-doing your roof make sure you install ice and water peel and stick eaves protection a minimum of 900mm (3′) up your roof slope, and a minimum of 300mm (12″) inside the interior plane of your exterior wall, whichever is greater.
That’s the quick primer on ice damming. We hope you found this to be informative and helpful! If you have any other ideas for best practice we’d love to hear them! Thanks for reading!
